Certificates and DNN as an Azure Web App
Overview
Securing access to your web application through the use of encryption is pretty much essential these days even if you aren’t actually selling anything. It is said that Google is giving preference, in general SEO terms at least as their advertisers will always come first, to those websites that are secured by certificate over those that are not and browsers such as Firefox and Chrome now also issue all sorts of doom and gloom warning if you dare to log in to a website without using encryption.
Adding a certificate to encrypt traffic between your users and your Azure Web App is a relatively painless process with two main parts:
- Obtaining and installing the certificate (in this part)
- Configuring DNN to use encryption (and that is in part 2)
Obtaining and installing the certificate
You can, of course, purchase SSL certificates directly from Azure (and they are quite cheap) but you may have corporate arrangements that determine where you purchase your certificates. In my case, there was such an arrangement with Digicert. The process is, however, much the same for any certificate provider.
1. Creating the certificate request
Creating a certificate request for an Azure Web App is much the same as for any web server although you don’t have access to the actual server so you either have to resort to rolling your own using something like openssl or using Digicert’s own utility. As it had been a long day, the Digicert utility was chosen. Note that you may wish to add multiple domain names to the certificate request if you have, for example, www.mycompany.com and www.mycompany.net even if all the web traffic is redirected inside DNN to www.mycompany.com. That will, naturally, add to the cost of the certificate.
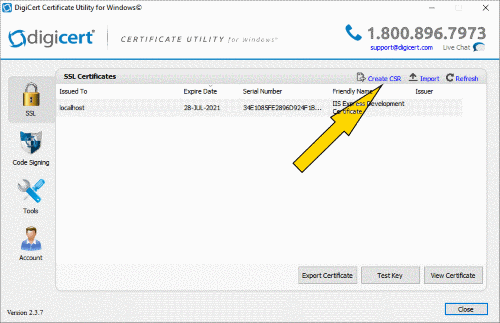
This is quite easy to use – select the Create CSR option and fill in the form. This will generate the necessary certificate request that you can then upload to your chosen certificate provider (even if it isn’t Digicert). It is worth noting that not all certificate providers will automatically add your domain name as a subject alternative name to the certificate so it makes sense to add it to the certificate request so that you can use either www.mycompany.com or, as is the modern idiom, simply mycompany.com.
2. Prepare the certificate for import into Azure
Once the certificate has been processed – this may take a few hours depending on the type of certificate that you want to buy, you can import it back on to the machine that you made the request. This is important if you used the Digicert utility – as this is where the private key is actually stored - but optional if you went old school and used a manly tool like openssl. You need the key as Azure likes its certificates to be in PFX format. Since I was in GUI mode, I just used the Digicert utility to do the export. Select the certificate and then the Export Certificate button. Export the file as a PFX file with the private key and select the option to include all the certificates in the chain just in case the Digicert root and intermediate certificates are not already present in the misty lands of Azure. If you have ever done any work with load balancers then this process will be rather familiar.
3. Upload Certificate and create an SSL binding
Now we are ready to import the certificate into Azure. A bit of background information first though. If you have multiple domains configured on your Azure Web App - say a .net and a .com - then the certificate will likely only have the .com name in it as, inside DNN, you will likely be redirecting all your web traffic to the .com address anyway. That means you will be using SNI (Server Name Indication) so remember to select that option. Incidentally, you need to be on a pricing tier that supports SNI and certificate use i.e. Basic level or better (or just more expensive if you are cynical).
Importing the certificate into Azure
Log into Azure and select your Web App. Start the certificate import by selecting SSL Certificates under Settings.
Select upload certificate.
Browse to your PFX file and enter the password that you created during the export process.
Add an SSL binding
So you can actually use the certificate, an SSL binding (or several)will need to be added
You will recall that both www.mycompany.com and mycompony.com had been added as names to the certificate that was requested so, having completed the creation of an SSL binding for www.mycompany.com, repeat the process for mycompany.com using the same certificate. If there were other names, such as mycompany.net, in the certificate that you purchased then a binding would also be needed for them using the same certificate.
That’s all you need to do to allow you to access your Azure web site using HTTPS instead of HTTP. However, the above steps merely allow you to use SSL but do not actually enforce the use of SSL so your site will still be accessible using unencrypted HTTP.
So, to properly complete the process, DNN has now to be configured to enforce the use of HTTPS but that, dear readers, will be dealt with in part 2.