Migrating a DNN (Dotnetnuke) site to the Cloud Part 2
Now that the initial investigation phase has completed and it has been determined that the source DNN (or Evoq) portal is suitable for migration, it is now necessary to set up the Azure App Service that will be the destination for the migration.
There are, of course, other options such as migrating everything to a Virtual machine in Azure but, given the traffic patterns for the source website, an Azure App Service was the most appropriate choice. The App Service would provide a fault tolerant solution for the back end SQL database and the front end web service could be scaled up as required to service peaks in demand and scaled down again afterwards thus saving the customer a bit of money over a period of time.
The high level steps in this section are as follows:
- Creating and configuring the App Service
- Configuring Azure to accept your domain names
Creating and configuring the App Service
Create an Azure account
If you don't have an Azure account, create an account at https://azure.microsoft.com. Note that, at the time of writing at least, that you get £150 of credit towards the cost of Azure services in your first month. After that you get to pay for everything so it is therefore best, and cheaper, to do all your cloud experimentation sooner rather than later. That free credit also allows you the luxury of having several practice runs so that you can get the migration right upon the night.
Create an Azure App Service
Now that you have an account, you can log on to the Azure Portal and you will see the dashboard. Select the icon for App Services from the vertical list on the left.
Click Add
There are many options available to you but, for this migration, a selection from the Web + Mobile category is appropriate. Some of the options are shown in the following illustration including a basic DNN installation but, as we have an existing installation that we will be migrating, a basic web platform is all that is actually needed so the Web App + SQL option can be selected.
Now the App Service has to be configured. This is a simple process as all you are doing is setting a physical location for the App Service and creating an empty database. Again, there are many options but, as the website that is to be migrated is small, selecting from the standard options will suffice. It is probably worth mentioning that it is beneficial to follow some sport of naming convention for the many components that make up an Azure App Service such as the web app, resource groups and databases.
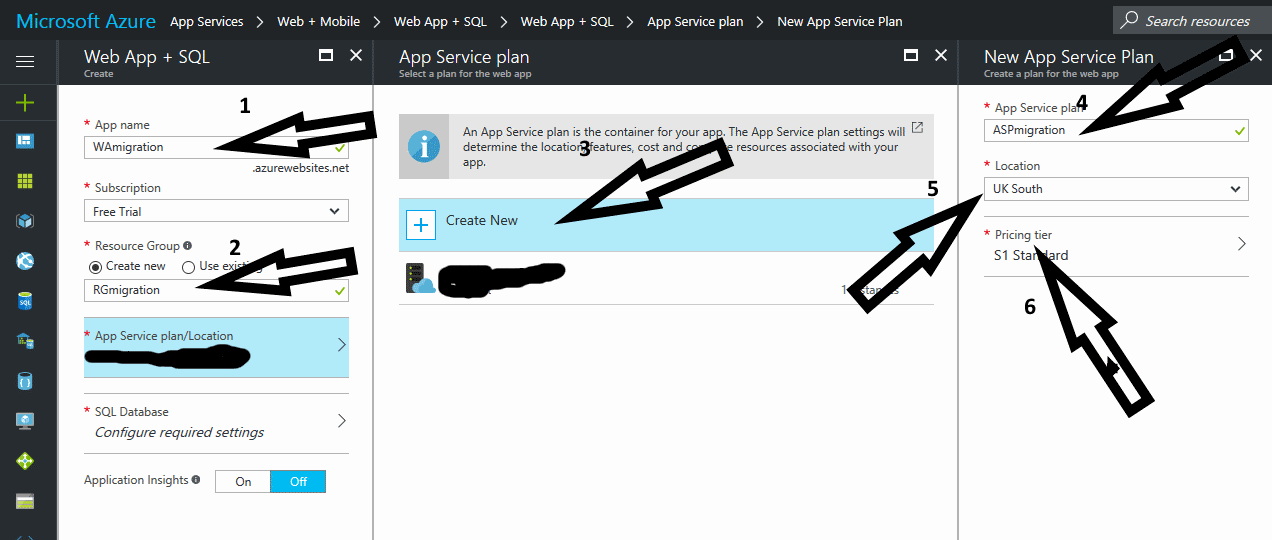
- 1. Set a name for your web app
- 2. Set a name for the resource group. This resource group keeps all the components of your App Service web application together to ease administration.
- 3. Create a new App Service Plan.
- 4. Name your new App Service Plan.
- 5. Select a geographic location for your App Service. Azure had data centres all around the world.
- 6. Select a pricing tier. The more money you pay the faster your App Service web application will be and, unsurprisingly, if you select the basic or free options then performance will suffer accordingly. For this example, S1 Standard has been selected.
Create a new database
- 1. For the purposes of the migration we just need an empty SQL database so the option to create a new database was selected.
- 2. Name your database. The default collation for your database is SQL_Latin_General_CP1_CI_AS which is suitable for most English language DNN installations.
- 3. Name your database server. Note that you don’t actually get your own physical database server so this is just a marketing person’s way of making you feel better about spending your money in Azure.
- 4. Create a login for your database. This account gets dbo rights on the database.
- 5. Set a password for your SQL admin account.
- 6. Set a location for your database “server”. Although it would seem possible to create this anywhere, it makes sense – especially in terms of performance – to create it in the same location as the rest of your App Service.
Remember to select an approriate performance option for your SQL database.
Again, the DNN website has no special need for performance so the standard option was selected
Now that all the options have been selected, create the actual App Service. This may take several minutes
Configuring Azure to accept your domain names
It is also necessary to setup the domain names you will be using with the Azure App Service as well. To do this, select domain from the menu on the left hand side of the Azure web portal.
The first step is to add your external domain name. By default, the migrated website will be accessible from the Internet using the Azure App Service web application name such as wamigration.azurewebsites.net but end users will expect to access your website using a URL like migrationcompany.com so this will have to be added.
Note that if you have multiple domain names setup within your DNN portal so that redirection can be used then these will all have to be added. Such redirection is commonplace in DNN installation as it allows you to redirect traffic from migrationcomapny.co.uk or migrationcompany.net to migrationcompany.com.
The first step is to add the domain name.
It is then necessary to prove ownership of the domain that you will use with your Azure App Service websites. If you use Office 365 then this is usually a straightforward process that links your Azure account to your Office 365 account. Otherwise, it is necessary to add a TXT record to the external DNS zone for the domain that you wish to add. Remember to add it to your external DNS zone and not your internal zone. Some organisations use “split DNS” with the same DNS zone being used internally and externally so it worth remembering that Azure will only check the external copy of the DNS zone.
The text record will be similar to the one shown in the following illustration.
The steps necessary to add the TXT record will vary depending on who hosts your DNS zone but, regardless of the hosting company, it will still take some time for the change to replicate so wait an hour and then select the Verify button. If the DNS change has replicated then the domain will be added to Azure. You should repeat this process for any other domains that your DNN installation uses.
Your Azure Dashboard will now show your virtual empire.
With the above steps completed, you are now ready to start the actual migration of your DNN installation to Azure.