SCCM Technotes - Ubuntu and your AD certificate authority
If, like me, you are a born and bred Windows guy, then the land of Linux is a country full of mystery and arcane incantations (aka the shell). However, SCCM can manage just about anything these days so it is inevitable that you will have to deploy the SCCM client on to a Linux server. In the following example, the installation was going to be on some web servers running Ubuntu 14.04 but the procedure should work on other variations on a Debian theme.
As encryption is used for the communication between client – regardless of operating system – and the SCCM servers, a suitable client certificate is required and that certificate is likely, in the enterprise environment at least, to come from an internal, Active Directory integrated, PKI environment. So, if we are to use certificates issued by your internal certificate authorities, the root and any intermediate certificate authority certificates have first to be added to as trusted certificate authorities.
This, fortunately, turned out to be a straightforward process.
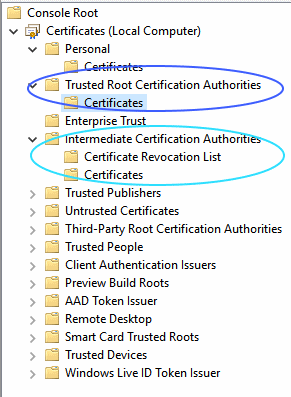
First, go to a domain joined Windows computer and start the Certificates MMC snap-in. This needs to be run as Administrator as the certificates that we are interested in are in the Local Computer store rather than the user store. The root certificate will be stored in Trusted Root Certification Authorities\Certificates and any intermediate certificates will be in Intermediate Certificate Authorities\Certificates. Right click on the appropriate certificates and export them. Make sure that you select x509 format – the Windows default is DER format – so that the Ubuntu server will recognise it. Some versions of Ubuntu as picky about file extensions so save the exported certificate files with a crt extension.

Then copy the exported crt files to the Ubuntu server. In my case, the servers were web servers so they all had FTP enabled. If the Ubuntu server is running SSH, then the files can also be copied using SCP (the WinSCP tool will give you a nice (free) graphical interface) to ease your task.
After that, the copied files will be in the wrong place – usually some sort of user or shared upload directory – so they will need to be put in the correct place for import. So, log on to your Ubuntu server either through the console if it is a VM or you have physical access or remotely using SSH. As Linux, like Windows, is secure by default, you will need an admin (or root) level account to perform the actual import of the certificates.
The next step is therefore to copy the uploaded files to the correct location and complete the import process. The commands used were as follows (change the filenames to your own).
sudo cp rootca.crt /usr/share/ca-certificates/entrootca.crt
sudo cp intermca.crt /usr/share/ca-certificates/entintm.crt
sudo update-ca-certificates
Once the previous command completes, your root and intermediate certificates will have been imported and converted to a pem format file (entrootca.pem and entintm.pem) and copied to the /etc/ssl/certs directory and your Ubuntu server will now accept certificates issued by your AD integrated certificate authorities.